Showing posts with label frugal living. Show all posts

Friday, November 6, 2009

Tips for Disneyworld on a Budget

I scoured the Internet when planning our Disney vacation for money-saving tips. A lot of sites had one or two helpful tips, but I never found a good comprehensive list. Here are several things we did to save money and have fun at Disneyworld.


Disney on a Budget

1) Travel during the off-season: Frommer's gives you an idea of when the best off-season times to travel to Orlando are. You will find much better rates on everything - from airfare to hotels - during off-season travel periods. For our late October/early November vacation, our hotel and airfare (booked together on expedia.com) totalled $640 after taxes - that included two adult round trip flights from Kansas City to Orlando and seven nights at our hotel.

2) Unless you plan on doing all Disney all the time, don't worry about booking a room in a Disney Resort property. We stayed at Comfort Inn Lake Buena Vista. It was a 10-15 minute drive to the parks (by car or by the free shuttle the hotel offered) and had all of the amenities we wanted (pool, fridge, microwave, laundry). We simply aren't at any hotel enough to justify the exorbitant rates we would have paid at a Disney property.
Our rooms at the Comfort Inn were newly remodeled and in great shape. The electronic billboard outside of the hotel said all rooms were $60/night; you would be lucky to book a room on a Disney property for less than $100/night, even during "Value Season."

3) Tour a resort to get reduced prices on your tickets: Our hotel "concierge" offered us tickets at almost half price in return for spending 1.5 - 2 hours touring a resort property. You can read a little bit about our experience in this post. One day tickets for a Disney park at the gate will run you about $85-$90, we got our tickets for $49 each (including taxes).
I would not trust the discount ticket booths you see all over Orlando - their agents buy the unused days from tourists with multiple day tickets and then sell the tickets back to you. There is no way to verify how many days are left, and often the Disney employees will ask you for an ID at the gate. You are not assured of getting in to a park on a recycled ticket.

4) Bring a soft-sided cooler with you and pack your own meals/snacks: Meals in the parks can add up quickly. Depending on the number of people in your family, you can save a significant amount of money by bringing in quick and easy meals rather than buying the processed food available at Disney.
I booked a hotel with a refrigerator and microwave, and we stopped at the grocery store on the day we arrived. We bought cereal and fruit for breakfast, sandwich fixin's and veggies for lunch, a case of bottled water, and I had packed lots of granola bars and crackers for snacks. We also ate dinner a few times at the hotel: rotisserie chicken, veggies steamed in the bag, and a delicious pasta meal that we cooked in the bag.
I packed napkins, plastic silverware, and Ziploc bags in our checked suitcase, and we bought a package of disposable bowls for the hotel room. We packed our cooler every morning using ice from the hotel ice machines, and it was easy to transport around the parks in our stroller. We also took the cooler with us when we visited both coasts.

5) Don't pay parking fees: Stay in a hotel that offers free shuttles, or park at Downtown Disney for free and take a free Disney shuttle to the parks. Parking on a Disney park lot will run you $14/day. That can add up if you are spending more than one day at the parks.

6) Bring souvenirs with you: Bypass the expensive souvenirs sold in the parks and bring some with you instead. You can look for better deals on Ebay, craigslist, garage sales, and your local stores. Once in Orlando, skip the big "Florida/Disney Gift" cheapie stores (most are huge blue buildings); their merchandise is very poor quality (and a lot of it is in seriously bad taste). There are a few Disney outlets that sell old/discontinued Disney merchandise, but we didn't find any Earth-shattering deals at the character outlet we went to.
One other thing to buy before you go - anything glow in the dark if you plan on attending the night parade at Magic Kingdom. We bought glow in the dark bracelets at Target - 12 for $1; we ended up handing most of them out to kids around us at the parade (I love the generosity of toddlers!!). We also bought Disney stickers and tattoos at Walmart, Kieran enjoyed those on the plane and at the parks.

Disneyworld is a fantastic experience for all ages, and you do not have to be wealthy to go. Just be smart, plan ahead, and take advantage of the money saving ideas offered by the veterans.

Have a magical day,
~d

Friday, October 9, 2009

Simple Homemade Stocking Stuffer Idea

At the risk of revealing some of my family members' Christmas gifts, I wanted to share a few crafts I am making this holiday season.

Today I'm going to show you how to make personalized picture magnets.


Materials you will need for picture magnets
Pictures resized down to the dimensions you want (and printed)
Lightweight wood (about 1/8" thick)
X-Acto knife (or something to cut your wood with)
Ruler
Low grit sandpaper

1) Select the pictures you would like to use and resize them. There are two ways you can do this: you can either cut your wood to fit the pictures, or you can resize your pictures to fit the wood.
     a) If you want a variety of magnet sizes and  more freedom in selecting your pictures, resize your pictures and cut the wood to fit. Pro: you can choose the pictures you want and crop them however you'd like. Con: This way takes more time (cutting the wood is time-consuming, and you will have to measure each piece individually).
    b) If you want more uniformly sized magnets, decide on the dimensions of your magnets and resize your pictures to fit. Pro: this will save you time in the long run, because cutting wood to fit is a pain. Con: you may have to crop pictures strangely to fit your wood pieces.

Paint.net, a free program available to download online, is a good way to resize pictures. The pictures I used here range from one to two inches on each side.

2) Cut your wood. We have used different types of wood - lightweight Balsa wood sheets are too flimsy, we prefer a heavier wood. The magnets shown here used a sheet of wood that was about 1/8" thick. To cut the wood, we used an X-Acto knife, a ruler, and a self-healing cutting mat.

3) Sand your wood. We sanded each piece with a low grit sandpaper enough to smooth rough edges and corners.

4) Print and cut your pictures; make sure they will lay neatly on the wood pieces.

5) Adhere the pictures to the wood with Mod Podge and a small foam brush. Apply one layer, wait about thirty minutes for it to dry then add a second layer.
We used the gloss finish (rather than matte), so the magnets turned out shiny. Matte Mod Podge will give your magnets a more muted finish.

6) After your Mod Podge is dry, attach the magnets. We just used a roll of adhesive-backed magnets. Set something heavy on top of your magnets so they will firmly attach to the wood.


You can make your magnets even fancier by cutting the wood to allow for a border around your pictures. Decorate the border using things like scrapbook paper, glitter glue, stain, paint, rubber stamps, etc.

If you don't have time to be crafty, you can hire me to make your magnets. I will make you a set of 3 magnets on wood for $9, or on antique wooden dominoes for $12. I will give discounts for multiple sets. These are perfect for giving to family, friends, and kids as regular gifts or as stocking stuffers.

Enjoy!

Thursday, October 1, 2009

Skip to My Loo

Since I obviously have some readers who are concerned about their impact on the environment (the winner of the free Diva Cup will be announced at the end of this post, by the way), today’s post is a public service announcement on one more way you can save a few hundred pounds of paper from landfills, conserve water, and reduce pollution in our environment.

Ready for it?

Stop using toilet paper.

No, I’m not advocating for a return to corncobs (ouch – whose idea was that?!), but I would like you to at least consider an alternative to the fluffy, bleached stuff. Let’s take a quick look at that squeezable king of the one-time-use products.

Coming Out of the Water Closet (A Brief History of TP)

Toilet paper isn’t new. As early as the 6th century AD, people in medieval China used actual paper to clean their nether regions. In 589 AD, one Chinese scholar wrote that he refused to use any page with “quotations or commentaries from [the] 'Five Classics' . . . .” (1) (If I’m ever forced to use books in the bathroom for more than reading, I can think of a few authors that I wouldn’t mind sacrificing.)

Later Chinese dynasties worked on the art of toilet paper manufacture to produce softer plies, some of which were even perfumed. Other cultures have used wool, lace, wood shavings, leaves, seashells, sponges, or their hands. (2)

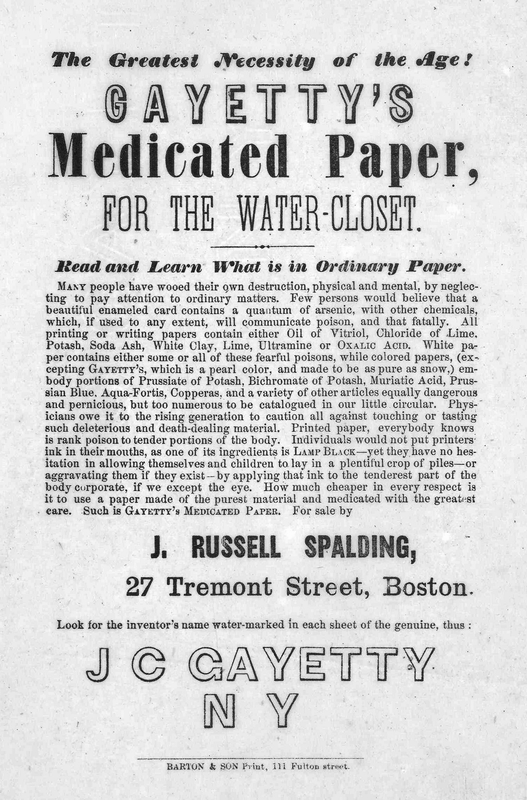
By the late 1800’s flush toilets were becoming the standard, so some of the more natural wiping tools did not work with the new indoor plumbing (corncobs tend to get stuck in the pipes no matter how many times you flush). (3) Hence, modern toilet paper was introduced in the United States in 1857 with the tagline “The greatest necessity of the age! Gayetty’s medicated paper for the water-closet.” (4)

Just like feminine products, toilet paper was not considered a topic for polite conversation. One of Gayetty’s competitors, the Scott Paper Company, “was once so embarrassed that it was manufacturing toilet paper that it wouldn’t put its label on the product.” (5) Another company tried to profit on the taboo nature of toilet paper. Their 1930’s advertisements read: “Ask for a roll of Hakle and you won’t have to say toilet paper!” (6)

Eventually, Americans grew to love toilet paper in all of its fluffy glory. We loved it so much that when Johnny Carson “joked about a toilet paper shortage in [a December 1973] opening monologue[,]” frantic viewers took him seriously and bought as much as they could, causing a national shortage. And companies were no longer afraid to stamp their name on toilet paper. Advertising became so rampant that a 1978 “TV Guide poll named Mr. Whipple -- the affable grocer who implored customers, ‘Please don't squeeze the Charmin’ -- the third best-known man in America, behind former President Richard Nixon and the Rev. Billy Graham.” (7)

Those advertising dollars have paid off. As a country, we spend more than $6 billion dollars on toilet paper every year. And what does that dollar amount translate to in waste? How about 15,202,986,200 pounds*: today, the average American uses over 50 pounds of toilet paper each year. (*That’s my calculation. The current U.S. population is 304,059,724; I just multiplied that by 50 to get an approximate total number of pounds per year for everyone.) (8)

The Ecological Disaster

“‘No forest of any kind should be used to make toilet paper,’ said Dr. Allen Hershkowitz, a senior scientist and waste expert with the Natural Resource Defense Council.” (9) I agree. America (and, therefore, Charmin et al.) does not. Millions of trees – including old growth forests in Canada – are harvested each year to keep the U.S. stocked up. And while manufacturers could make toilet paper from recycled materials at a similar cost, consumers demand a softer ply which can only be obtained from standing trees. (10)

One website calculated that we cut down 7,026,856 trees per year to produce toilet paper for the United States. (11) You may be surprised to discover that trees aren’t the real environmental concern, though. Because we have managed timberlands, we replace as many trees (or more) as are cut down. The real issue is two-fold: 1) the amount of paper waste in our landfills; and 2) the effects of dioxin, which is a bleaching by-product produced throughout the manufacturing process. (12)

1) Our crowded landfills: The average American uses approximately 700 pounds of paper products every year, most of which will end up in landfills. If every person in the U.S. traded one regular roll of toilet paper for a recycled roll, we could save 1.2 million cubic feet of landfill space (as well as 470,000 trees and 169 million gallons of water). (13)

2) Dioxin “is one of the most toxic human-made chemicals.” It is made during manufacturing when the pulp is bleached (it is bleached so our toilet paper is white). And once it is released into the environment, it is there for good (until it gets into our food supply, of course), because natural bacteria cannot break it down. (14) Dioxin was the primary toxic substance in Agent Orange, and it has been linked to cancer, reproductive and developmental problems, birth defects, diabetes, immune system suppression, fertility problems, and more. (15)

Using unbleached (or “chlorine free”) recycled paper (toilet paper, coffee filters, napkins, etc.) would greatly decrease the amount of this dangerous chemical building up in our bodies. (On a side note, I was shocked to read that “[i]n just six months of breast feeding, a baby in the United States will, on average, consume the EPA’s maximum lifetime dose of dioxin . . . .” Disgusting!) (16)

Lose the Rolls

So back to my original suggestion: Stop using toilet paper. Or at least stop using the super soft, bleached toilet paper. The effects of switching to a toilet paper alternative are dramatic: “If every household replaced just a single twelve-roll pack of regular bathroom tissue with a recycled variety, it would save almost five million trees and enough paper waste to fill seventeen thousand garbage trucks.” (17)

But even better, just think about the difference your family could make by switching to cloth! We’ve been using cloth wipes for over a year. I’ve also made some cloth wipes to sell – I’d love for some of you to be my very first customers.

Toilet paper has been around long enough to have many nicknames: “‘loo roll/paper,’ ‘toilet roll,’ ‘dunny roll/paper,’ ‘bathroom/toilet tissue, ‘TP’ or just ‘tissue.’” (18)

I’d like to help make cloth wipes mainstream enough to enjoy their own nicknames. My sister and her boyfriend fondly refers to hers as “pee pads" (credit to Darin for coming up with that particular alliteration). Most cloth wipe makers call them “family cloth.” Personally I like to call the ones I make “Tee Pee,” because they are two sided – one side is made of soft, snuggly flannel, the other side of 100% cotton recycled t-shirts (hence the “tee”), and they are made with your pee in mind. Well, maybe not *yours* specifically, but pee in general. Poo, too, if you’re brave (and are already doing a load of diaper laundry anyway).

Speaking of laundry, you can just throw your Tee Pee in with your regular wash. Think of it this way – have you ever laughed so hard that you peed yourself? Come on, admit it. Yeah. Did you throw out your undies? No, you laundered them without a second thought. These shouldn’t give you pause either – just toss them in the laundry basket. And as for the practical question of where to put them after use but before laundry day, I have a washable bag hanging on my bathroom door – I throw them in there and then grab it on my way to the washing machine. Easy peasy.

Here are a few pictures of some of the wipes I have available for sale. Let me know if you’re interested in getting some. They are .75 per wipe or 5 for $3.50. They will more than pay for themselves since you will not be buying over 50 pounds of toilet paper for each person in your house every year.


They are also super handy to use as baby wipes (I can also make & sell you some wonderful wipe solution, if you're interested). I can even get cutesy flannel for those of you who want to coordinate with your bathroom or your baby decor.  :)

DIVA WINNER!

I’d like to thank everyone one more time for reading my post on feminine products. I know that time is a precious commodity, and I’m honored that you chose to spend a few minutes with me. Like I said before, I wish every one of you could win a free Diva Cup, but they’re only giving one away. And because I am unable to commit to one winner, many thanks to Brookie-Lee from Happybottomus who was impartial enough to select one lucky lady.

Be sure to head over to www.happybottomus.com – everyone who commented will get 10% off of non-diaper items and 5% off of diaper items. Brookie-Lee carries Diva Cups, cloth pads/panty liners/nursing pads (I got mine there at an incredibly reasonable price!), and more.

Drum roll for our winner . . . MEGHANMONGEON will receive a free Diva Cup!

Here is what Brookie-Lee said about her choice:
I have found through the last several years that the best way to help parents to improve their health, their child’s health, and keep the environment healthy is through education. People just don’t know about a lot of things. They don’t realize how their waste is impacting the earth, they don’t realize that the chemicals in disposables are dangerous, they don’t realize there are better options that will save them time and money. I used a diva cup for the first time for a few cycles between my second and third child. And when my menses returns I will use it again. I love it and as many have stated it’s like I don’t have a period. This product is not only a waste free option, it is the healthiest alternative(along with cloth pads) to tampons and conventional pads. And the most comfortable option for mom in my opinion. So in reading through the different responses to Dionna’s blog, meghanmongeon's post really stuck out to me. Not only does she sound like a mama that could benefit from the gift of a Diva Cup but her passion for education and her access to new mamas is exciting for the natural movement. Hopefully more people will learn about healthy and eco-friendly products like the Diva Cup and these products will become mainstream someday. But for the time being the more families that can be reached, the healthier our fellow man. Congratulations meghanmoneon! And please spread the Diva Cup love!

I also loved the post from Aravinda, “The cup is the eco-feminist solution of the century!” I may have to put that on a sign in my store. :D

Brookie-Lee Glaser

Mother of 3

Owner of Happybottomus
MEGHANMONGEON - I know you through MDC, right? Send me a PM so I can get your info to ship you the Diva Cup!

(1) http://en.wikipedia.org/wiki/Toilet_paper ("Wikipedia")
(2) Wikipedia
(3) http://www.cnn.com/2009/LIVING/wayoflife/07/07/mf.toilet.paper.history/index.html ("CNN")
(4) Wikipedia
(5) http://abcnews.go.com/Entertainment/story?id=93597&page=1
(6) CNN
(7) CNN
(8) CNN
(9) http://www.nytimes.com/2009/02/26/science/earth/26charmin.html ("NY Times")
(10) NY Times
(11) http://www.greenlivingtips.com/articles/7/1/Toilet-paper-and-the-environment.html
(12) http://encyclopedia.toiletpaperworld.com/toilet-paper-history/toilet-paper-and-the-environment ("Toilet Paper World")
(13) Toilet Paper World
(14) Toilet Paper World
(15) http://www.ejnet.org/dioxin/
(16) http://www.all-creatures.org/cb/a-dioxin.html
(17) Rogers, Elizabeth & Kostigen, Thomas M., "The Green Book" at 66 (2007)
(18) Wikipedia

Thursday, September 24, 2009

Simply Divine

My sister's boyfriend groans inwardly every time my sister and I get together, because we inevitably start talking about something related to the female body. We really can't help it, it's all so fascinating! Tom, on the other hand, has either become so accustomed to it that he's no longer affected, or he's now able to tune me out at the mere mention of certain words. It's probably a combination of the two. At any rate, I'll lose both of them with the next sentence:

Today's post is about menses. (I'll wait while several of the male persuasion consult Merriam and Webster about that one.)

Now that we're alone, ladies, let's talk about our periods. (And if you stick with me to the end of this long post, there's a potential reward!) More specifically, let's discuss the subject of tampons, pads, and one of  their alternatives, the menstrual cup. Tom gave me “the look” when I told him I was going to blog about my Diva Cup. But why not? I haven’t seen any widespread marketing campaigns for tampon/pad alternatives, nor is menstruation a subject that most women discuss over lunch, or coffee, or a rum and coke. Or, ever, really.

That menstruation is taboo is not a new phenomenon, it has been this way for generations. In fact, while there is evidence that women have been using homemade pads and tampons as early as the ancient Egyptians in the fifteenth century B.C., the first commercial pad wasn’t manufactured until almost the twentieth century. (1) This first pad (a.k.a. the “sanitary napkin”) failed, because the makers couldn’t advertise it – such a topic was “improper.” (2) Even when Kotex came on the market around 1920, “[m]arketing these products was difficult because of society's squeamishness.” (3) The company that made Kotex was so worried that the pad would ruin its image, it created a separate company to sell only pads. “Stores wouldn't carry [Kotex], magazines wouldn't advertise it, and sales unsurprisingly weren't so hot[,]” until Montgomery Ward took a chance on it in a 1925 catalog. With the blessing of the retail giant, and with the “marketing innovation” that allowed women to buy a box of Kotex without having to ask a male store clerk to get it from behind the counter, the mass produced pad became mainstream. (4)

Early sanitary napkins were awkward things. (5) Women wore a belt that buckled around their waist and threaded a pocket between their legs. The pocket could be stuffed with whatever they chose – cotton, cheesecloth, etc.; almost all were washable and reusable. Women weren’t free of belts until the 1970s, when pads finally featured adhesive backings.


Tampons were available commercially (sans applicators) as early as the late 1920s; the first tampon with a plastic applicator appeared in the 1930s. (6) Surprisingly enough, menstrual cups aren’t new either – the first patents appeared in the 1930s. (7) The first cups were made of rubber; today most are “manufactured from silicone because of its hypoallergenic properties.” (8)

And while the market was slowly catching on to the convenience of more modern feminine products, the guys in charge were still reluctant to acknowledge the products' existence. They were so reluctant that the National Association of Broadcasters banned advertising of sanitary napkins, tampons, and douches until 1972. (9) Today, we are more accustomed to advertisements for feminine products. Unfortunately, we still don’t like to talk about them or our periods.

Menstruation is a big part of a woman’s life. The average woman can have 350 to 450 menstrual periods in her lifetime. (10) Wow! That many periods means we go through a lot of tampons and/or pads. One site estimates that a woman uses almost 17,000 tampons throughout her lifetime. (11)

17,000 tampons. And if you are anything like I used to be, you might wear a tampon and a panty liner, just in case. Let’s stop and ponder the environmental impact of the millions of used tampons and pads floating around our Earth.

One waste consultant estimated “that 6.5 billion tampons and 13.5 billion sanitary pads, plus their packaging, ended up in landfills or sewer systems in 1998. And according to the Center for Marine Conservation, over 170,000 tampon applicators were collected along U.S. coastal areas between 1998 and 1999.” (12) Setting aside the issue of the toxic waste we create by disposing of our sanitary products, consider the environmental impact of the continuous production of disposable products – both the product and the packaging. Not only is there the pollution of the manufacturing process, but there is also the not-so-small matter of the toxins introduced into cotton during the growing process. “No less than 170 insecticides are registered for use on cotton crops[!]” (13) One author predicts that if only one in twenty women chose to switch "to organic tampons, we could eliminate 750,000 pounds of pesticides annually." (14)

In the US, it’s estimated that conventional cotton farms apply about one-third of a pound of chemical fertilizers and pesticides for every pound of cotton harvested. The various chemicals used to treat conventional cotton can harm beneficial insects and soil micro-organisms, pollute ground and surface water, and adversely affect the health of humans and wildlife alike—including fish, birds, and livestock.
Almost half of the chemicals sprayed on global cotton crops annually—an estimated $2 billion worth—are classified as hazardous by the World Health Organization (WHO). Pesticide residues remain in tampons in the form of dioxins and other potentially harmful chemicals. The vaginal walls are made of the most absorbent tissues in the body, so these chemicals are absorbed directly into the blood stream. (15)

That brings me to my second point: the potential health concerns over using disposable feminine products. Aside from the toxins present due to the growing process, tampons can also contain absorbency enhancers, deodorants/fragrances, and chlorine compounds that are used to bleach the cotton. (16) Some of these substances may be carcinogens; others may “cause irritation, allergic reactions and may upset the vagina’s natural microbial balance.” (17)

Tampons also contain rayon, which is a manmade fiber composed of tiny strands of plastic. These fibers may cause “microtears of the vaginal wall when a tampon is inserted or removed, possibly leaving the vagina more susceptible to infection.” (18) And as we all likely know, both tampons and pads can increase your chance of developing a bacterial infection. (19)

As for the menstrual cup?

They are safe. There are no known health related risks to using a cup. (20) They are environmentally friendly: they can last for years, there is nothing to throw away, and they are not disposable (in the sense that tampons and pads are), so the manufacturing process does not have as negative of an impact.

They are cost effective. If you are concerned about your wallet, consider the cost: an average woman will spend approximately $10 each month on disposable feminine products. (21) You can get a menstrual cup for a one-time investment of $20-$30, and it should last you at least a year; some claim that their cups last up to ten years. Let’s say you spend $30 on a menstrual cup that you use for five years – that equals a savings to you of $570 (if you had spent $10/month in the same amount of time). Awesome!

They are comfortable. I’ve used mine for four cycles now, and I don’t notice its presence once I’ve inserted it correctly. (Insertion, by the way, has been my biggest complaint. It is a skill that you perfect over time, but it’s not really complicated.) One complaint many women have about tampons is that they cause overdryness. “More than a quarter of the fluids absorbed by a tampon are, in fact, natural and necessary vaginal secretions.” (22) Because menstrual cups collect, rather than absorb, fluid, you should not experience the feeling of dryness caused by tampons.

They are easy and clean. Menstrual cups hold more fluid than a highly absorbent tampon, so you need to “change” them much less often (normally two to four times on even your heaviest day). All you do when it’s time to change it is (carefully) pop it out, empty the cup into the toilet, give it a rinse (not necessary, but I always do), and reinsert. In between cycles, you should sterilize the cup by boiling it. And because of the secure seal they form, they are more effective than tampons or pads, plus they are perfectly safe for any activity – no leaks. For the record, I also use a thin cloth panty liner, just in case.

There are many menstrual cups to choose from. I use the Diva Cup; the other popular brand in the U.S. is The Keeper, and this Wikipedia page lists several other manufacturers.

______________________________

I have been so excited to share all of this with you, and if you’ve made it with me this far, (thank you!) there is a possible reward. The makers of Diva Cup are super cool, and they’ve agreed to sponsor a contest. Leave your comment about why you would like to try a Diva Cup. It can be serious, funny, clever, informative, or a straight plea for Diva Cup mercy.
I (and probably an impartial third party) will choose the best comment, and that person will receive a Diva Cup absolutely free! The winner will be chosen on October 1st, so please submit your comment no later than midnight on September 30.
I look forward to reading everyone’s comments. Also, be sure to tune in for an upcoming post on another hush hush topic . . . toilet paper!!

***Be sure to check back on October 1st to see if you are the winner. I'll need to figure out how to contact you so Diva Cup can send you the correct size cup!***


(1) http://www.straightdope.com/columns/read/2252/who-invented-tampons ("The Straight Dope") (quoting Freidman, Nancy, Everything You Must Know About Tampons (1981))
(2) The Straight Dope (citing Delaney, Janice, Lupton, Mary Jane & Toth, Emily, The Curse: A Cultural History of Menstruation (2d ed. 1988))
(3) The Straight Dope (citing Delaney, et al.)
(4) The Straight Dope (quoting Heinrich, Thomas & Batchelor, Bob, Kotex, Kleenex, Huggies: Kimberly-Clark And The Consumer Revolution In American Business (Historical Perspective on Business Enterprise) (2004))
(5) http://mum.org/belts.htm,http://www.mum.org/belt1908.htm
(6) The Straight Dope
(7) http://en.wikipedia.org/wiki/Menstrual_cup#History ("Wikipedia")
(8) Wikipedia
(9) The Straight Dope
(10) http://www.womensenews.org/article.cfm?aid=1879
(11) http://www.emagazine.com/view/?510 ("E Magazine")
(12) E Magazine
(13) http://www.fresh-moon.com/part-environmental-cost-menstrual-pads-tampons-a-22.html
(14) Rogers, Elizabeth & Kostigen, Thomas M., "The Green Book" at 105 (2007) 
(15) http://www.greenyour.com/body/personal-care/feminine-hygiene/tips/choose-organic-tampons-or-organic-pads ("Green Living") (citing http://www.sustainablecotton.org/html/who_we_are.html)
(16) http://www.miacup.co.za/eng/why_features.php ("Miacup")
(17) Miacup (citing Armstrong, Liz & Adrienne Scott, "Stop the WhiteWash" (1992), Toronto: The Weed Foundation)
(18) Miacup
(19) Miacup (citing Wroblewski, Sandra Sieler, "Toxic Shock Syndrome" (January 1981), The American Journal of Nursing, vol. 81 (1), pp. 82-85; Neff, Melissa G., "Acute Female Cystitis", US Pharmacist, vol 26 (9))
(20) Wikipedia 
(21) http://www.comfyclothpads.com/
(22) Miacup (citing R. Levin et al., "Absorption of menstrual discharge by tampons inserted during menstruation: quantitative assessment of blood and total fluid content" (July 1986), BJOG: An International Journal of Obstetrics and Gynaecology, vol. 93 (7), pp. 765–772)

Wednesday, September 9, 2009

Another Fine Mess

Many of the families that I know from my area attachment parenting group participate in a cooperative learning program (“co-op”). It’s pretty simple: to participate in the co-op, you have to offer at least one class. Classes can be geared toward any age, even adults, but most of our classes are for the preschool set. Once you offer a class, you can enroll in as many classes as you’d like. No one can make money off of a class; teachers can only charge enough fees to cover their expenses.
Kieran and I have participated in the co-op since he was seven or eight months old, and I have been helping coordinate behind the scenes for the last three quarters. We’ve done so many things that I never would have thought of (or had the energy to prepare) on our own. Here are a few examples: we’ve done tours of a fire station, nature centers, and a local television weather station, a watercolor class, nuudle art, puppet shows, a class where we rode a city bus, and our favorite – a music class called “Toddler Tunes” that lasted for almost a year before the mama had another commitment that prevented her from teaching it (sniff).
This quarter, the first class I offered was a “Messy Party.” Today a group of one to four year olds descended on us to finger paint with pudding, sit in a pool full of beans for measure and pouring play, stick their fingers in Gloop, and enjoy the rest of Kieran’s regular toys. Originally, we were also going to have a pool full of dried rice, painting with regular paint, and fun with bubbles and our sand/water table, but Mother Nature decided to pour on us all day. We did, however, go out and have some messy and wet fun playing in the rain. Everyone had so much fun, and since parents came with the expectation that their kids were going to be a mess, there was no tension or frustration due to smeared clothing or extensive clean-up.
Any one of these activities would be perfect for a toddler on any given day, and none of them are incredibly expensive to prepare. The pudding was simply vanilla instant pudding with a few drops of food coloring; the beans were the biggest expense but will be bagged and stored for later use (I just bought the cheapie pinto beans from Walmart). I love the feeling of Gloop, I've included the very easy recipe below. 
 
Finger painting with pudding

 Kieran is much more interested in eating the paint rather than painting with it.

How many kids can you fit into a pool full of beans?

Gloop! So fun to squish and squeeze.
Gloop Recipe
2 parts cornstarch
1 part water
Food coloring
*Mix food coloring into water. Pour cornstarch into a bowl, add water. The mixture should feel kind of hard/crumbly, but when you hold it in your hand the Gloop will "melt" off of it. The top of the Gloop will look like liquid, but feel like a solid. It's a great sensory activity!
Have a messy day!
~d

Monday, September 7, 2009

That's How We Roll


As a stay at home mama to a busy toddler, I’m constantly searching online for new ideas in several areas: 
*fun/educational activities for my son;
*information on attachment parenting, gentle discipline, and other techniques that model responsive/sensitive parenting;
*creative ways to be frugal on our one income budget;
*information on living more consciously (i.e., eating healthy, whole foods; doing our part to leave the Earth a nice place to live by reducing our ecological footprint); and
*promoting causes I believe in such as increased/extended breastfeeding; an overhaul of our broken vaccination system/schedule; the case against circumcision; and others that I’ll write about here from time to time.
On those rare occasions I have time to be crafty, I also like finding ideas on relatively simple crafts to make (and perhaps sell).
It is my hope that this blog will compile some useful information on the above topics for others who are searching.
____________________________________
For this first post, I thought I’d share one of Kieran’s recent firsts – his first homemade biscuit-making experience. I am guilty of giving in to the simplicity of store-bought biscuits. It’s so easy to peel the can open and slide the pre-made dough into the oven. (On that note, am I the only person who always jumps as the can bursts open at the seam when pressed with a spoon? I know it's coming, yet I still gasp and jump like it was surprising.) But in my quest to make more things from scratch and do new things with Kieran, I decided to give from-scratch biscuits a try. 
I remember making biscuits with my mom when I was younger. Kneading and rolling the dough was always intensely relaxing, and I can still hear the sound of each biscuit falling out of the mouth of the glass we used to cut them out – a small, satisfying “pop.” As you can see from the pictures below, Kieran shares my fondness for the process. 
He knew he was in for a treat when I cleared the table and let him throw flour everywhere. A mess? He was in! He helped me with every step – he measured, poured, stirred, cut, kneaded, and rolled like a pro. And true to his mama’s side of the family, he took several pinches of dough to nibble on (sampling for quality is a requirement in our house).
Being a complete biscuit novice, I was surprised when my biscuits stayed as flat as we’d rolled them. Doh (or dough, as the case may be *wink wink*) – that’s what happens when you don’t use a recipe that calls for yeast! Regardless of their thinness, the biscuits were little round hunks of heaven. We doubled the recipe that follows below and made about 20 biscuits and 15 cinnamon kisses. We froze half for later consumption (I’ll let you know if they thaw and reheat well).
Making biscuits from scratch is a money saver. Even if you had to buy every ingredient listed I doubt you'd spend more than $10.00, and you could make hundreds of biscuits if you so chose. Cans of pre-made biscuits sell for $1-$2 at Walmart and Aldi, 8-10 biscuits per can. 

Enjoy the pictures of our precious mini-baker, and let me know if you have a favorite biscuit recipe. Maybe we can have a bake-off!
 
Rolling with the miniature rolling pin I used to play with as a little girl.


I think he liked rolling with mama's big rolling pin even more!


 Cutting out the biscuits using a glass I filched from my grandma's cupboard.


Spooning on cinnamon sugar to make kisses. 
This, by the way, was the dough he most enjoyed sampling.
____________________________________
My Mom's Buttermilk Biscuit Recipe
  
1/2 cup shortening (I used butter flavored Crisco)
2 c all purpose/unbleached flour
(*the reviews I read or whole wheat flour were less than stellar, so I didn't try it this time)
1 Tbsp Sugar
2 tsp baking powder
1/4 tsp baking soda
3/4 c buttermilk (more or less; it needs to be enough to mix 
all of the dry ingredients into the ball of dough.)

Sift all of the dry ingredients into a large bowl.
Cut the Crisco into the dry ingredients until it is about the consistency of cornmeal.
Stir in buttermilk until the dough forms a "ball" and doesn't stick to the sides of the bowl.
Flour your table (use wax paper if you'd like); roll your rolling pin and what you are going to cut the biscuits out with in the flour so they don't stick to the dough.
Put the dough in the middle of the flour and knead it at least 20 times. Handle lightly and don't overknead it or it will get too tough.  Pat the dough out a bit with your hands and then finish with the rolling pin. The biscuits will not rise in the oven, so leave your dough at least 3/4 of an inch thick. 
Cut out biscuits and place on an ungreased cookie sheet. Put them side by side if you want them to have soft sides or about an inch apart if you want them to have crispier sides.  
Bake at 450 degrees until golden brown; about 10-12 minutes. 

For cinnamon kisses, conserve part of the batch (or make a double batch like I did!), and roll it out thinner than you did for the biscuits (about 1/4 inch thick).
Spread butter on the layer of dough, then sprinkle with a cinnamon sugar mix (like you would use to make cinnamon toast) generously all over the butter. 
Roll it up about 3 rolls, then cut it and start a fresh roll. 
Slice into pieces about 1 inch wide. Place them on the cookie sheet with the biscuits. (My mom's recipe said to cook at 400 degrees for 10-12 minutes, but I just tossed them in with the biscuits and they turned out fine.)

I cut out all of my biscuits and made the kisses, flash froze them on a cookie sheet, then tossed them in a freezer safe Ziploc bag.
Unfortunately I don't have a picture of our biscuits to share with you right now, I'll try to remember to snap one next time. 

Thanks for stopping by! 


~d